Friday, August 27, 2010

New Guard Idea

Almost...


but not quite. Maybe it needs more strands.


And a little more lace. What do you think?


Sunday, August 22, 2010

Swiss Army Ammo Bags Revisited


I've been using these bags for a couple of weeks now, and am LOVING them. They are a little heavy, being made from thick leather and waxed cotton, but they are wonderful. They are very waterproof (everything inside stayed dry even when they got dunked in the flood waters last week) sturdy, roomy and just plain good looking. So, since I've decided that I love them, they needed a better way to attach to the rack besides the belt I stole from Husband.

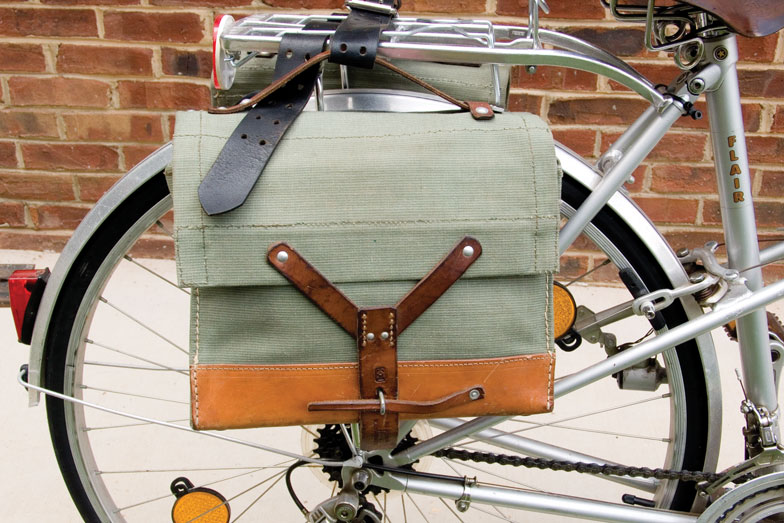
Here's what we came up with:


It's held on with 2 leather straps (actually, another leather belt that was sacrificed for the project) that are bolted onto the bag.

Here's how we did it:

Materials:


Swiss Army Ammo Bag(s), 1 leather belt about 1.5 - 2 inches wide, 16 (8 per bag) washers (we used stainless steel), 4@ 1/4-20 x 1/2 hex cap screws, 4@ 1/4-20 x 3/4 (or even 1" depending on how thick your leather belt is) hex cap screws (which we forgot about and had to cut down some other screws we had) and nuts. An awl for poking holes, ruler, sharpie or other marker, heavy duty scissors,rolling cutter, exacto or something to cut the belt with.

Step 1:


Cut the belt into 4 equal pieces of about 9" or so.

Step 2:


Take 2 washers. Line the first one up to the end of the leather, and butt the 2nd washer up to the first. Make sure they are centered on the leather. Using your marker or awl, mark the center of each hole. Then at the opposite end of the leather, take just 1 washer and do the same.


Then, using the awl (or a drill), make holes in the leather.


Step 3:

Now, holding your bag up to your rack, find and measure the space available for your leather to loop over. Not all racks are the same. For my bags to fit both the rack on my Hercules and my Pletscher rack, the leather strap had to come in 1 5/8 from the stitching to where I put the mark for the hole.


So, take your 2 washers, and place them on the bag bringing the center of the washer to whatever your measurement is.

Step 4:

Once you've marked for holes on both sides of the bag, use your awl (or you can cheat like we did and use the drill press. I suppose you could make an electric hand drill work as well) and make holes.


Step 5:


Lay the leather on the bag, back side up (if your leather has a front and back), lining the 2 holes on the leather up with the 2 holes in the bag. The end of the leather with 1 hole should be towards the top of the bag. Place a washer over the bottom hole, and put one of the 1/4 screws through it and the bag.


On the inside, place another washer on the screw and then the nut. Tighten that nut down. Fold the leather over (the front of the leather should be showing now), and repeat the order of washer, screw, washer nut as for bottom hole. No need to tighten this one down all the way, just enough to hold it all together. Repeat this for the other side.

Step 6:


Attach to your rack. Unscrew the nut and remove it, washer and screw from the top set of hardware. Loop the leather over your rack, and replace the hardware assembly as before. Repeat for the other side of the bag.

I know that this is not the easiest mounting system, especially if you are inclined to want to remove the bags with any frequency, but it is definitely a sturdy way to attach them. Also, it's silent. Now metal hook to bounce and clatter around. I pretty much let them live on the bicycle since this time of year I'm mostly using Hedwig, so the Pain in the Assness of the mounting system isn't a big deal. If I were to be in a situation where I wanted to take them in stores with me, or move them between bicycles often, I probably would have bought heavy duty snaps and put them where the single top screw is. I can still do that if I decide that I want to move them between bicycles more often.

Thursday, August 19, 2010

Hedwig... Chickened Out on the Swim

Well, that doesn't look good!

This is about 3/4 of a mile from the tunnel. Hrm. We got some rain today, but I didn't think that it was as much as the storm we had on Tuesday.


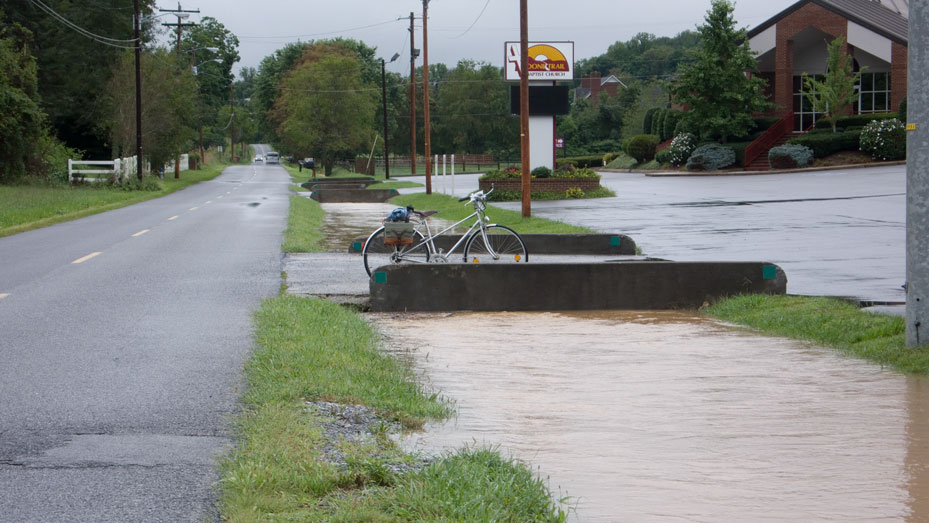
The scenery only began to get more and more submerged the closer I got.

Umm... now what? I tried to walk her through, but this time the water was MUCH deeper. And moving a lot faster. I got to just under the tunnel and the water was already at about mid thigh (which on little 'ole me is about 21"), and the ground was still sloping downward. So we turned around and rode home to get the car (and take a different route to work. I wasn't about to try and drive through that either!)

Tuesday, August 17, 2010

Hedwig Takes a Swim


Yesterday evening we got hit with a really good thunderstorm. We haven't gotten much rain lately, so it was a welcome rain, but it made for a bit of a challenge on the ride home. I've ridden in some heavy rain, so that didn't bother me. What I saw turning on to this road was a little troubling:


It's flooded! In the 4 years that we've lived here I've never seen this road flood. There is a creek that runs near it, and signs that say the tunnel further along is impassible in high water, but I was beginning to think that maybe the creek had changed or something since I had never seen any high water here. Well, I was wrong. The water was about 4-6 inches deep along the whole stretch to the tunnel. I sat and watched a couple of cars brave it first while I took some pictures.The headlights in this picture belong to a motorist that I call Subaru Chick. I pass her almost everyday, and every time she smiles and waves enthusiastically. She makes my evening commutes cheery.


Things looked a little more dramatic once I got to the tunnel. Honestly, if I were in a car I would not have driven through. I decided to walk through the tunnel, since the current looked a bit rough. Also, I was concerned about snapping turtles. I see them hanging out in this area often, and didn't want to encounter one in the water. There is a little elevated curb along the left side, and I was able to walk on that while walking Hedwig beside me.


The water was over her bottom bracket for most of the way through, but once I got to the end the water was MUCH deeper. About 15 inches deep! I had gotten back on her from the curb, and started to ride the last 5 feet or so out of the tunnel. The water was just at my pedals at their highest point!


This ditch on the other side of the tunnel is about 4 feet deep. It's like river through there! It goes on for about a mile and a half through this little valley until the landscape gets hilly again.


See that fire hydrant in the corner of this picture? It's half way submerged! Nothing like a little challenge for your commute. :)

Wednesday, August 11, 2010

Guard your skirts! It's here!


Finally, the crochet skirt guard has been tested and deemed worthy for your enjoyment! You can find it on Etsy as either a finished set hand crocheted by me, or for the crafty DIYrs, a PDF is available there, and on Ravelry as well.


Enjoy! :)

Sunday, August 8, 2010

Crochet Skirt Guard Test Ride/ Excuse to Ride to the Lake

Today I met up with my friend, Audrey, for a bicycle ride to the Boone Lake. I live about 4 miles from the lake, and had never ridden bikes there. We've driven there, and taken the kayaks there, but had never been there by bike. So, since she doesn't bike ride much (spends all her time she could be on a bicycle on horses) we decided that it was about time she got off of one saddle and on to another.


We lazed about in the water for an hour or so, then let our inner 8 year olds out and hit the playground. Nice way to spend a Sunday morning. We left just as everyone else started showing up.

Today I rode Helena, since it had been awhile since I had ridden her, and I wanted to test out the new crochet skirt guards and rear bag (more on the bags later). The guards work out beautifully! My little clips that I need more of stayed on and my skirt stayed out of the spokes and brakes. I'm even happy with my hair tie solution holding it to the dropouts. So it looks like it's good to go!


Friday, August 6, 2010

Surplus


I love military surplus. I really don't know why, but I have always been attracted to OD green and leather. I've owned and loved many a pair of combat boots, field jackets, tents, ammo boxes and bags. To me, good surplus store is just as drool worthy as any yarn shop, bicycle shop or antique store. So here are my newest surplus finds:


A pair of 1964 Swiss military ammo bags. When I saw these I immediately knew that they had to go on Hedwig. Or Helena for that matter. I NEEDED them. And actually, I really did need some panniers anyway, so why not re-purpose these?


Since I won't be able to get to the hardware store until Saturday, and I was impatient, I stole one of my husbands belts and strapped them on. I've been using them like this for 3 days, and am very happy with them. Not so happy about strapping them on with a belt, but that will be corrected in time. :)


They measure about 11"x9"x4. In one I keep all the things I need to get to everyday (wallet, phone, ipod, advil, snacks, camera, etc.) In the other I've got my raincoat (which is a full trench coat with hood), ball cap, safety glasses, gloves and some plastic bags.


They hold quite a lot more than I really expected, or need to ever carry to go to the barn. They feel very rugged. The canvas is quite heavy as is the leather. My husband is jealous. I'm going to get him one next week.

Thursday, August 5, 2010

Nearly got hit by a cliche'!

So I'm sitting in the left turn lane waiting for some traffic to pass when a tiny little chick in an enormous Escalade who was about to make a left onto the street I was on, apparently couldn't be bothered to turn her steering wheel enough to place her car in the lane intended. Instead, she was just going to cut right across the left turn lane, and ME to make her turn. She screeched to a stop right in front of me, jaw dropped, eyes wide and totally forgot how to drive her car! At first she attempted to back up onto the street she was trying to leave, but couldn't because of the cars behind her. That made her more flustered, so she cranked the wheel around, waved and yelled "Oh my god I'm so sorry!" at me, and drove her car past me on the wrong side into the ONCOMING lane! I realized after she had finally gotten sorted out that I had just stood there over my bike in the turn lane, hands on hips, glaring at her the whole time. I apparently have no fear of being hit, and will stare down and intimidate drivers. Must come from years of working with big dumb (but cute and lovable!) animals. Perhaps this is something I need to work on. :)

Oh yeah...


MUCH better:


Unfortunately I only have 4 of these hooks and need 16 all together for this size guard. Then I will ride it around on a bumpy road to make sure they stay on. I also changed the shaping for the brake space. It has more clearance now.


Now I just need to find time to get to the hardware store and pick up something to attach it to the dropouts (I'm using a hair tie right now).

Tuesday, August 3, 2010

Firsts

Well it was bound to happen sooner or later. This morning I rode over to my vet to pick up a prescription for our sick kitteh. I had just thrown on some flip flops since it's about 1/2 a mile from my house. I had stopped at the stoplight at the end of my street, and when it turned green, right as I was pushing off someone honked their horn, startling me and my left foot slipped forward off the pedal scraping a good bit of flesh off. I hadn't really noticed until I got to the vet how bad it was, since I was on the road. I just pushed off again and rode on. But once I got there and took a look it was pretty nasty. Bloody and already turning purple. I'll spare you guys photos. It doesn't hurt to ride on, but smarts quite nicely when walking. So that's my first official cycling injury since my teens.

On my way home from work this evening I was passed by *gasp!* another cyclist! Who waved as he zoomed past! That's the first time I've seen another cyclist on that bit of road, and the first in a VERY long time. Then, as I watched him approach the light way off in the distance, I saw him make a left on red without stopping. Sigh. Oh well.

Skirt guard. It's giving me hell. It's beautiful and I love it, but the bloody thing won't cooperate attachment wise. Right now it's attached to the fender and looking good (figured out something that works well, and looks pretty good too without drilling) but now it's giving me problems attaching at the hub end, but only on the chain side. So really it's not the guard, but the chainguard that's the culprit. So I'm stepping away from that for a few days whilst I ponder what to do.